Hello, Please let me know how to do the print head alignment for Canon printer in Windows. I am facing some issues with this. Help me.
 1 Ans
1 Ans 3 years ago
Print head alignment is the way to make the position of your print head correct. It also helps you to refine the deviated colours and lines. Below are a few steps to manually perform the print head alignment for Canon printer in Windows and making your prints worth it.
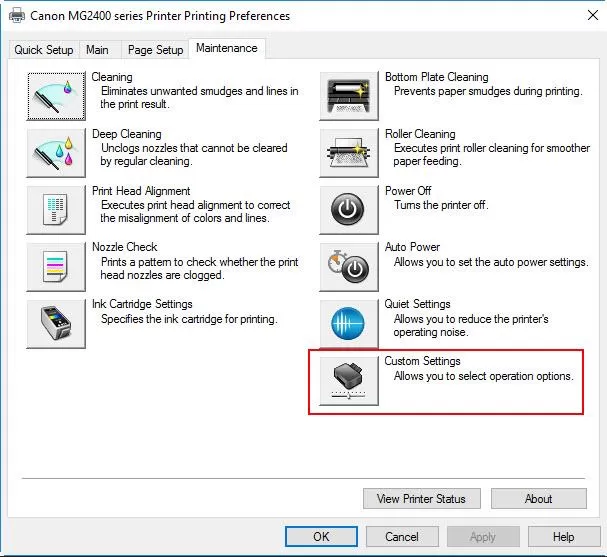
Step 1: Go to the printer driver setup window and under the maintenance menu, click on the custom settings.
Step 2: Once the custom settings dialogue box appears on your screen.

Step 3: Check the Align heads manually check the box if it is unchecked.

Step 4: Next, a window will appear on the next screen and you will have to click on OK.

Step 5: Select Print Head Alignment on the Maintenance tab. The Start Print Head Alignment dialogue box opens.
Step 6: In the next step, load 3 sheets of paper (A4 or letter-size papers) into the paper tray.
Step 7: Check if the machine is turned on and then click on the Align print head.
Step 8: Next, follow the on-screen instructions to proceed.
Step 9: You will get a printed page on your screen with number patterns or values in 5 rows. Refer to this screen as you proceed to the next steps.
Step 10: Enter the numbers of the patterns with the least amount of stripes in the applicable columns.
Step 11: Once you have entered all the values, click on OK.
Step 12: Pick the setting that produces the least noticeable vertical stripes.
Pick the setting that produces the least noticeable horizontal stripes.
Step 13: Confirm the displayed message and then select OK. The second pattern prints.
Step 14: Continue with the similar steps above. This time you will choose only the least noticeable vertical stripes. Once you will enter all the values, click on OK.
Pick the setting that produces the least noticeable vertical stripes.
Step 15: Confirm the displayed message and then select OK. The second pattern prints.
Step 16: Next, Continue with the similar steps above. This time you will choose only the least noticeable horizontal stripes. Once you will enter all the values, click on OK.
Pick the setting that produces the least noticeable horizontal stripes.
Step 17: Go to the Start Print Head Alignment dialogue box, and then click on Print Alignment Value to print and check the modifications you just made to the settings.
(Make sure to refer the user manual you got for the model names).
Lastly, right click on your model name (in the icon) and then on the printing preferences under the menu. The printer driver setup window will appear on your screen.
We hope the above article helped you to perform the print head alignment for Canon printer in Windows.

Mar 4, 2024
Mar 18, 2024
Mar 4, 2024
Mar 18, 2024
Mar 4, 2024
Mar 4, 2024
Mar 18, 2024
Mar 4, 2024
Mar 4, 2024
Mar 4, 2024

Jun 29, 2024
Jun 17, 2024
Feb 25, 2025
Jul 27, 2024
Jun 11, 2024
Aug 8, 2024
Jul 20, 2024
Mar 6, 2025
Nov 27, 2020
Oct 7, 2020
Dec 30, 2020
Mar 30, 2021
Nov 27, 2020
Feb 20, 2021
Nov 7, 2020
Dec 7, 2021